Have you ever admired a rose and thought, “I wish I could draw one like that”? 🌸 You’re not alone! Roses are timeless symbols of love and beauty — and drawing one isn’t as difficult as it looks. Whether you’re a beginner learning to sketch, a kid exploring art, or a creative soul wanting to refine your skills, this complete guide will show you exactly how to draw a rose step by step — easily, beautifully, and confidently.
⚡ Quick Answer
To draw a rose, start with a small spiral for the center, then add curved petals around it, layering outward. Next, draw the sepal base, stem, and leaves. Finish by shading inside the petals and coloring them red, pink, or any hue you like. 🌹
🎯 Who This Tutorial Is For
This guide is for:
- 🧒 Kids — who love fun, simple drawings.
- ✏️ Beginners — who want a clear step-by-step process.
- 🎨 Artists — looking for realistic shading and detail.
- 🌼 Craft lovers — making greeting cards, posters, or tattoo art.
🧩 Step-by-Step: How to Draw a Rose (Easy for Everyone)
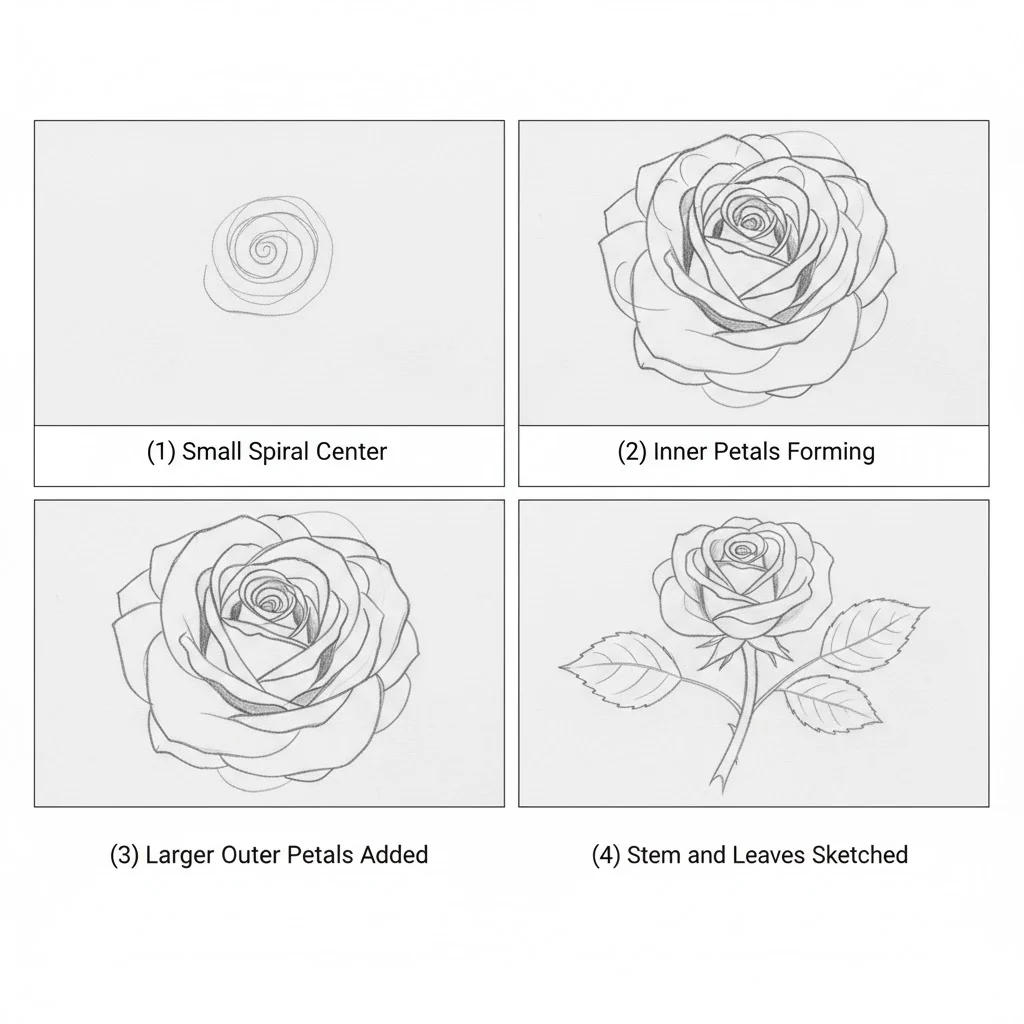
Follow these detailed steps and watch your rose bloom on paper.
Step 1: Draw the Center Spiral
Start with a small spiral — it’s the rosebud at the heart of the flower.
Keep your pencil pressure light; this inner swirl defines the rose’s core.
Step 2: Add the First Petal Layer
Around the spiral, draw several curved “C” shapes. Each curve represents a petal gently unfolding.
Overlap them slightly to show how real petals wrap around each other.
Step 3: Expand with Larger Petals
Now widen your curves outward.
Each new layer of petals should be bigger and looser.
Vary their size to mimic nature’s imperfection — that’s what makes roses look alive!
Step 4: Shape the Rose Base (Sepal)
Below the bloom, sketch a small curved cup-like form.
This connects the rose to its stem and supports the petals.
Step 5: Add the Stem
Draw two parallel lines extending downward from the sepal base.
Slight curves give the stem an organic look.
Add a few short spikes along one side for thorns 🌿.
Step 6: Draw the Leaves
Rose leaves have jagged edges and pointed tips.
Add one or two leaves branching out from the stem.
Sketch fine veins inside to bring them to life.
Step 7: Clean the Outline
Trace over the final shapes using a darker pencil or pen.
Erase extra sketch marks to reveal a neat outline.
Step 8: Add Shading for Depth
Lightly shade the inner parts of petals, especially near overlaps.
Darken the base of the bloom and underside of leaves.
This contrast adds realism and 3-D effect.
Step 9: Add Color (Optional but Beautiful)
If coloring:
- Use red or pink for classic roses.
- Yellow or white for symbolic meanings (friendship, purity).
Blend light to dark tones from petal center to edges.
Add green hues for stems and leaves.
🎨 Easy Rose Drawing for Kids (Fun & Simple)
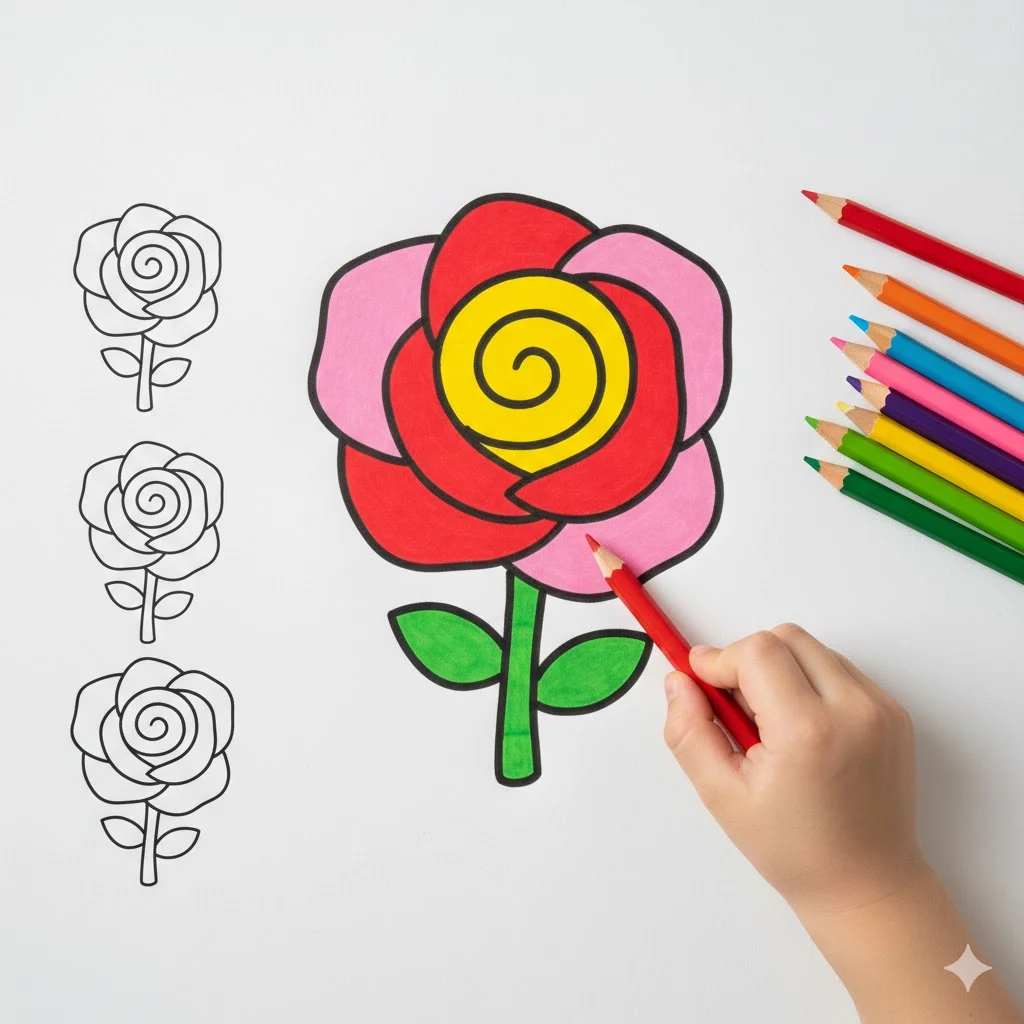
Kids can draw a cute rose in five easy shapes:
- Draw a spiral in the center.
- Surround it with five large petals.
- Add a short stem.
- Draw two simple leaves.
- Color it bright red or rainbow! 🌈
Encourage imagination — it doesn’t need to be perfect, just joyful.
🌺 Realistic Rose Drawing for Beginners & Artists
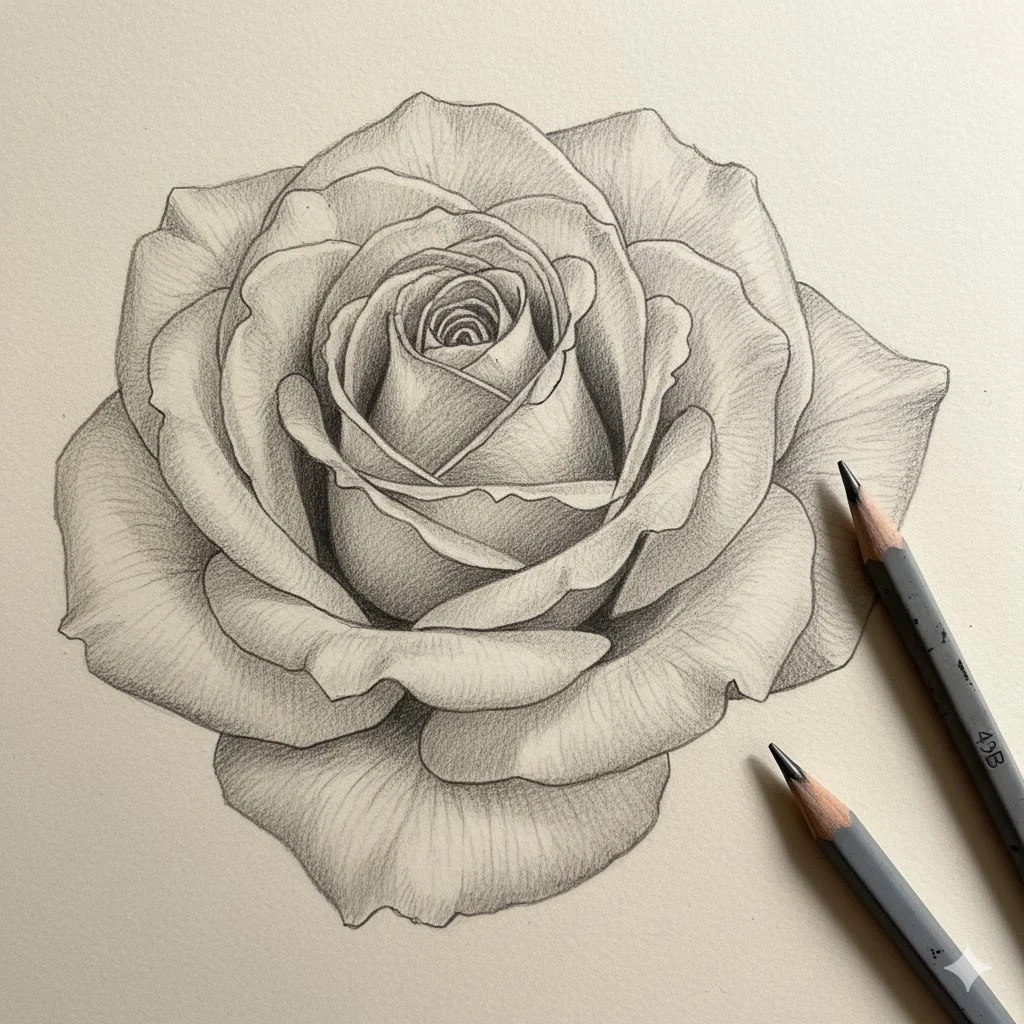
Want your rose to look photo-realistic? Use these artistic techniques:
1. Observe Real Roses
Look at photos or real flowers to study petal folds, light, and shadow.
2. Master Light Source
Pick one side for your light. Shade opposite sides of petals to create volume.
3. Use Layered Strokes
Draw petals in overlapping arcs, layering outward like concentric ripples.
4. Texture with Pencil Pressure
Press lightly for thin lines, harder for shadowed areas.
Short, curved strokes make soft petal textures.
5. Blend for Smoothness
Use tissue or blending stump to soften edges.
This creates that velvety rose look.
🌹 Creative Rose Drawing Ideas (for Practice & Fun)
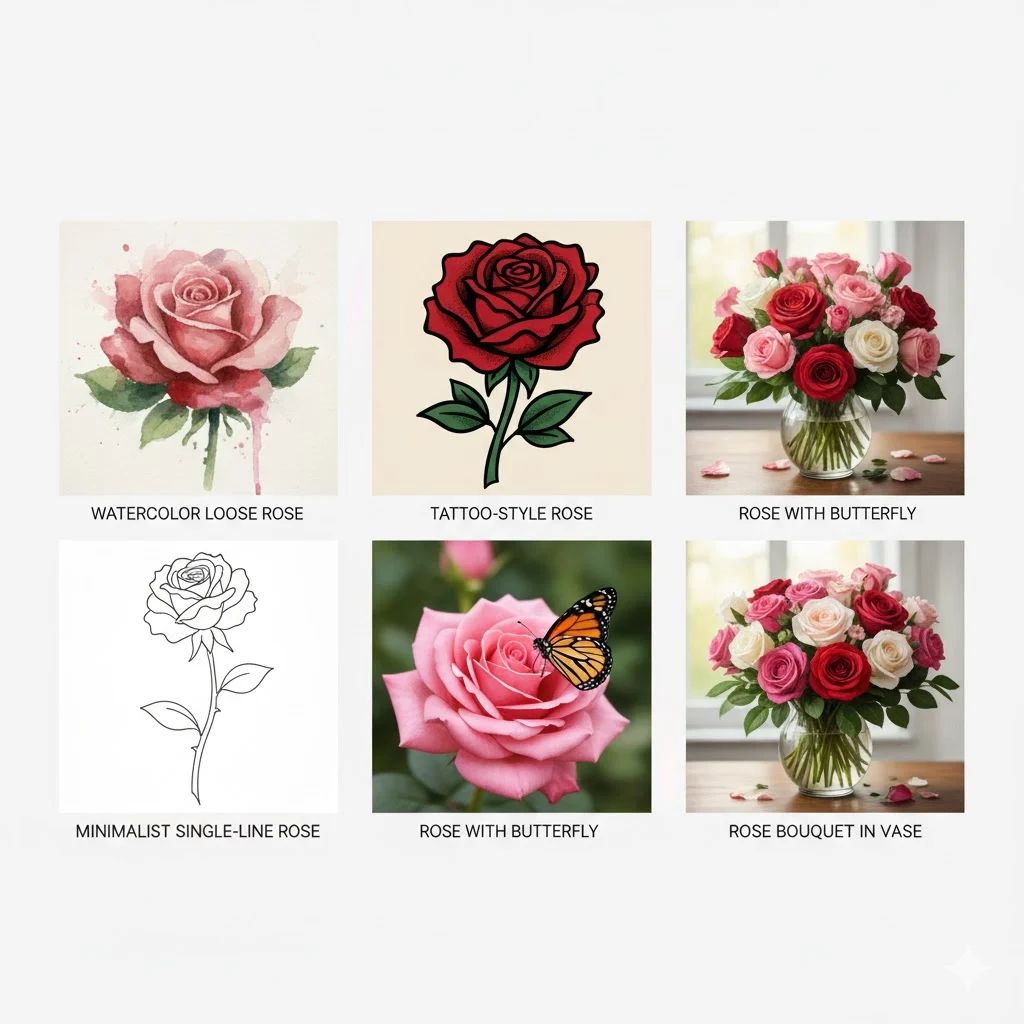
Try experimenting with different styles and themes:
| Rose Type | Description |
|---|---|
| Cartoon Rose | Bold outlines, large petals, bright colors — perfect for kids. |
| Realistic Rose | Detailed shading and soft transitions for a lifelike result. |
| Minimal Line Rose | Drawn with one continuous line — simple yet elegant. |
| Watercolor Rose | Soft color blending, dreamy and artistic. |
| Tattoo-Style Rose | Dark outlines, strong contrast — ideal for ink designs. |
👉 You can also try “rose in a vase,” “rose with heart,” or “wilted rose” to diversify your art portfolio.
🌿 Common Mistakes When Drawing Roses
- Petals too uniform or perfect — real petals vary!
- Ignoring light source — shading should follow lighting.
- Flat drawings — fix by adding depth under petals.
- Over-smudging — keep contrast crisp for texture.
- Forgetting the sepal — that small base adds realism.
💡 Pro Tips from Artists
- Always start light and build detail gradually.
- Layer petals for a natural spiral flow.
- Add a white highlight on petal edges for freshness.
- Keep stems slightly curved — straight stems look artificial.
- Compare your drawing from a distance to check proportions.
🧰 Tools You’ll Need
| Tool | Purpose |
|---|---|
| HB Pencil | Light outlines |
| 2B/4B Pencil | Shading & depth |
| Eraser | Refinement |
| Sharpener | Precision |
| Blending stump/tissue | Smooth gradients |
| Colored pencils or watercolor | Optional color finishing |
| Sketchbook or art sheet | Base surface |
💬 FAQs About Drawing Roses
Q1. How do I draw a rose easily?
Start with a spiral in the center, add curved petals outward, then draw a stem and leaves. Keep lines light and smooth.
Q2. What’s the best pencil for rose sketching?
Use HB for outlines and 2B–4B for shading. Softer pencils give deeper contrast.
Q3. How can I draw a realistic rose?
Focus on petal layers, correct light direction, and subtle blending to show texture.
Q4. Can kids draw roses too?
Absolutely! Kids can draw simple roses using 5–6 large petals and a short stem — it’s great art practice.
Q5. How long does it take to draw a rose?
A basic rose takes 10–15 minutes; a detailed one can take 45 minutes or more depending on shading.
🧩 Bonus: 10 Rose Drawing Ideas You Can Try 🌸
- Rose with heart (symbol of love)
- Rose bouquet
- Single rose in glass vase
- Rose with butterfly
- Black and white rose sketch
- Rose with name banner (tattoo idea)
- Half-open rosebud
- Digital rose (tablet drawing)
- Cartoon smiling rose
- Realistic wilted rose
These ideas not only enrich your creativity but also attract Pinterest and Google Image traffic, which boosts your site’s organic reach.
✅ Conclusion: Practice Blooms Perfection 🌹
Learning how to draw a rose teaches patience, observation, and creativity. Each petal you sketch refines your control and artistic eye. Don’t rush — let your hand follow the gentle rhythm of nature.
The more roses you draw, the more your technique blossoms — just like a garden that flourishes with care. So grab your pencil, take a deep breath, and let your art bloom beautifully! 🌷